Spring Boot Interview Questions and Answers (2026)
60+ Spring Boot interview questions with detailed answers and code examples. Covers Spring Core, Dependency Injection, IoC, annotations, REST APIs, Spring Data JPA, Spring Security, JWT, transactions, testing with Mockito, and more.
Spring Boot Basics
What is Spring Boot?
Spring Boot is an extension of the Spring Framework designed to simplify the development of Spring applications by providing convention over configuration.
In simple terms:
Spring Boot lets you build production ready applications quickly with:
- Minimal configuration
- Embedded servers
- Sensible defaults
What Spring Boot is not:
- Not a replacement for Spring
- Not a different framework
It uses Spring internally
Why was Spring Boot introduced?
Because traditional Spring became a configuration nightmare.
Problems with old Spring:
- Heavy XML configuration
- Manual bean setup
- External server setup
- Long project bootstrap time
Spring Boot was introduced to:
- Reduce boilerplate configuration
- Eliminate XML heavy setup
- Speed up development
- Make Spring beginner friendly and production ready
Difference between Spring and Spring Boot
| Feature | Spring | Spring Boot |
|---|---|---|
| Configuration | Requires manual configuration | Auto-configured |
| Setup | XML/Java config heavy | Minimal config |
| Server | External server needed | Embedded server |
| Project Setup | Slower project setup | Rapid development |
| Defaults | No defaults | Opinionated defaults |
Key takeaway:
Spring gives flexibility, Spring Boot gives productivity.
What are Spring Boot starter dependencies?
Starter dependencies are pre-defined dependency bundles that include:
- Required libraries
- Compatible versions
- Transitive dependencies
Example:
spring-boot-starter-webIncludes:
- Spring MVC
- Embedded Tomcat
- Jackson
- Validation APIs
Benefits:
- No version conflicts
- Less dependency management
What is an embedded server?
An embedded server is a web server that runs inside the application.
Supported servers:
- Tomcat (default)
- Jetty
- Undertow
Why it matters:
- No WAR deployment
- Run as a JAR
- Easy microservice deployment
java -jar app.jarThis is why Spring Boot fits microservices so well.
How does Spring Boot simplify configuration?
Spring Boot simplifies configuration using:
1. Auto-Configuration
Automatically creates beans based on:
- Classpath
- Existing beans
- Properties
2. Convention Over Configuration
Default behavior unless overridden.
3. application.properties / application.yml
Centralized configuration management.
4. Profiles
Different configurations for dev, test, prod.
5. Sensible Defaults
Works out of the box without manual tuning.
What is @SpringBootApplication?
@SpringBootApplication is the main annotation that bootstraps a Spring Boot application.
It is a combination of:
@SpringBootApplication
public class DemoApplication {
    public static void main(String[] args) {
        SpringApplication.run(DemoApplication.class, args);
    }
}
Internally includes:
1. @Configuration
- Allows Java based configuration
2. @EnableAutoConfiguration
- Enables Spring Boot's auto-configuration mechanism
3. @ComponentScan
- Scans components in the current package and sub-packages
Why it's important:
- Eliminates multiple annotations
- Single entry point for the app
- Triggers auto-configuration and component scanning
Spring Core
What is the Spring Framework?
The Spring Framework is a comprehensive Java framework used to build enterprise-level applications. Its main goal is to make Java development simpler, loosely coupled, and easier to test.
Instead of you manually creating objects, managing dependencies, handling transactions, security, etc., Spring does this for you using configuration and conventions.
Key ideas behind Spring:
- Loose coupling
- Separation of concerns
- Easier testing
- Better maintainability
Spring is modular, meaning you can use only what you need:
- Spring Core (foundation)
- Spring MVC
- Spring Data
- Spring Security
- Spring Boot (wrapper over Spring)
What is Spring Core?
Spring Core is the heart of the Spring Framework.
It provides the fundamental features on which everything else is built.
Spring Core mainly deals with:
- Inversion of Control (IoC)
- Dependency Injection (DI)
- Bean creation and lifecycle
- ApplicationContext and BeanFactory
What is Inversion of Control (IoC)?
Inversion of Control means you don't control object creation anymore. The framework does.
Without IoC:
Car car = new Car();You control everything. Sounds nice. Scales terribly.
With IoC:
Spring creates the object, configures it, manages it, and gives it to you when needed.
The control is inverted:
- Not your code calling the framework
- The framework calling your code
IoC is a design principle, not a feature
How is IoC implemented in Spring?
Spring implements IoC using Dependency Injection (DI).
Steps:
- You define beans (objects) using annotations or configuration
- Spring creates these beans
- Spring injects required dependencies
- Spring manages their lifecycle
The component responsible for this is the Spring Container:
- BeanFactory (basic)
- ApplicationContext (advanced, commonly used)
So:
IoC → implemented via DI → handled by Spring Container
What is Dependency Injection (DI)?
Dependency Injection means providing required dependencies to a class instead of the class creating them itself.
Without DI:
class Service {
    Repository repo = new Repository();
}
Tightly coupled. Bad for testing.
With DI:
class Service {
    Repository repo;

    Service(Repository repo) {
        this.repo = repo;
    }
}
Now the dependency is injected from outside.
Loose coupling achieved. Testing becomes easy.
DI is a practical implementation of IoC.
Types of Dependency Injection
Spring supports three types:
1. Constructor Injection (recommended)
@Service
class UserService {
    private final UserRepo repo;

    public UserService(UserRepo repo) {
        this.repo = repo;
    }
}
- Mandatory dependencies
- Immutable
- Best for testing
- Preferred in real projects
2. Setter Injection
@Autowired
public void setRepo(UserRepo repo) {
    this.repo = repo;
}
- Optional dependencies
- Flexible
- Less safe than constructor injection
3. Field Injection (discouraged)
@Autowired
private UserRepo repo;
- Easy to write
- Hard to test
- Breaks immutability
- Interviewers don't like it
Advantages of Spring Core
Spring Core provides multiple benefits:
1. Loose Coupling
Classes depend on interfaces, not implementations.
2. Easy Testing
Dependencies can be mocked or replaced.
3. Better Maintainability
Changes in one class don't break others.
4. Centralized Configuration
All object wiring is handled by Spring.
5. Lifecycle Management
Spring handles creation, initialization, and destruction of objects.
6. Scalability
Works well for small apps and large enterprise systems.
Core Annotations
What does @SpringBootApplication do internally?
@SpringBootApplication is not a single annotation. It is a meta-annotation that combines three critical annotations:
@SpringBootApplication =
@Configuration
@EnableAutoConfiguration
@ComponentScan
What each one does:
@Configuration
Marks the class as a source of bean definitions.
@EnableAutoConfiguration
Tells Spring Boot to automatically configure your app based on the dependencies in the classpath.
@ComponentScan
Scans the package of the main class and all sub-packages for Spring components.
Why this matters:
Spring Boot apps start with zero configuration, yet still work. This annotation is the reason.
Difference between @Component, @Service, @Repository
All three register a class as a Spring Bean. The difference is semantic, not functional.
| Annotation | Purpose |
|---|---|
| @Component | Generic stereotype |
| @Service | Business logic layer |
| @Repository | Data access layer |
Hidden advantage:
- @Repository enables exception translation (converts DB exceptions into Spring's DataAccessException).
- @Service improves readability and architecture clarity.
What is @Autowired? Constructor vs field injection
@Autowired tells Spring to inject a dependency automatically.
Constructor Injection (recommended)
@Service
class UserService {
    private final UserRepo repo;

    public UserService(UserRepo repo) {
        this.repo = repo;
    }
}
Why it's best:
- Mandatory dependencies
- Supports immutability
- Easy unit testing
- No reflection hacks
Field Injection (discouraged)
@Autowired
private UserRepo repo;
Why it's bad:
- Hard to test
- Breaks immutability
- Hidden dependencies
- Interviewers quietly judge you
Verdict: Constructor injection is preferred in real-world applications.
Difference between @Configuration and @Component
Both create Spring beans, but they are not the same.
@Component
- Generic bean
- No special behavior
@Configuration
- Used for configuration classes
- Ensures singleton behavior for @Bean methods
Example:
@Configuration
class AppConfig {

    @Bean
    public Service service() {
        return new Service();
    }
}
Key difference: @Configuration uses CGLIB proxy to ensure @Bean methods are called only once, maintaining singleton behavior.
What is @Bean?
@Bean tells Spring:
"Use this method's return value as a Spring-managed bean."
Used when:
- You don't own the class (third party library)
- You need fine-grained control
Example:
@Bean
public ObjectMapper objectMapper() {
    return new ObjectMapper();
}
Key point:
- Method name becomes bean name
- Bean lifecycle is managed by Spring
What is @RestController vs @Controller?
@Controller
- Used for MVC
- Returns views (HTML, JSP)
- Requires @ResponseBody for JSON
@RestController
- Combination of:
@RestController = @Controller + @ResponseBody
- Returns JSON/XML by default
- Used for REST APIs
What is @RequestMapping?
Maps HTTP requests to handler methods.
Example:
@RequestMapping("/users")
public class UserController { }
Supports:
- URL path
- HTTP method
- Headers
- Params
- Content type
It is the parent mapping annotation.
Difference between @GetMapping, @PostMapping
These are shortcuts for @RequestMapping.
| Annotation | HTTP Method |
|---|---|
| @GetMapping | GET |
| @PostMapping | POST |
| @PutMapping | PUT |
| @DeleteMapping | DELETE |
| @PatchMapping | PATCH |
Example:
@GetMapping("/users/{id}")
public User getUser(@PathVariable Long id) { }
Cleaner, readable, less error-prone.
What is @PathVariable vs @RequestParam?
@PathVariable
Extracts values from URL path.
@GetMapping("/users/{id}")
public User getUser(@PathVariable Long id) { }

// URL: /users/5
Used for:
- Resource identification
- Mandatory values
@RequestParam
Extracts values from query parameters.
@GetMapping("/users")
public List<User> getUsers(@RequestParam int page) { }

// URL: /users?page=1
Used for:
- Filters
- Optional parameters
Rule of thumb:
- Path → identity
- Query → filters/options
REST API & Web
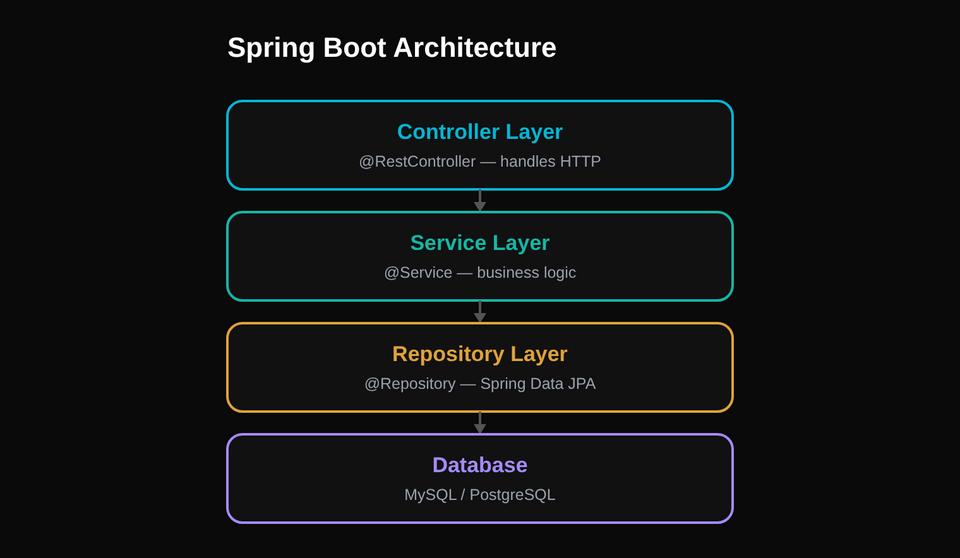
How does Spring Boot handle REST APIs?
Spring Boot handles REST APIs using Spring MVC on top of an embedded server (Tomcat by default).
Flow:
- HTTP request hits the embedded server
- Request is routed via DispatcherServlet
- Controller method is matched using mapping annotations
- Request data is converted to Java objects
- Business logic is executed
- Response is converted back to JSON and returned
Key annotations involved:
- @RestController
- @RequestMapping, @GetMapping, @PostMapping
- @RequestBody, @PathVariable, @RequestParam
Spring Boot automatically:
- Configures JSON serialization (Jackson)
- Sets up HTTP message converters
- Handles content negotiation
You write minimal code. Spring handles the plumbing.
What is REST?
REST (Representational State Transfer) is an architectural style for designing web services.
REST is based on:
- Resources (identified by URIs)
- HTTP methods
- Stateless communication
Example:
GET /users/1
POST /users
PUT /users/1
DELETE /users/1
Each URL represents a resource, not an action.
REST is not a protocol. It's a set of design constraints.
What is statelessness?
Statelessness means:
Every request contains all the information needed to process it.
The server does not store client session state between requests.
Why this matters:
- Easier scalability
- Better performance
- Fault tolerance
Example:
- JWT-based authentication
- Each request carries the token
If the server crashes, no session data is lost. That's the point.
Difference between PUT and PATCH
| PUT | PATCH |
|---|---|
| Replaces entire resource | Updates partial resource |
| Idempotent | May or may not be idempotent |
| Sends full object | Sends only changed fields |
Example:
PUT /users/1
{
  "name": "Ojas",
  "email": "[email protected]"
}
PATCH /users/1
{
  "email": "[email protected]"
}
Use PUT when replacing, PATCH when modifying.
What is idempotency?
An operation is idempotent if:
Multiple identical requests produce the same result as a single request.
Examples:
- GET → idempotent
- PUT → idempotent
- DELETE → idempotent
- POST → not idempotent
Why interviewers care:
- Helps with retries
- Prevents accidental duplication
- Critical in distributed systems
How do you handle HTTP status codes?
Spring Boot allows you to return proper HTTP status codes using:
Option 1: ResponseEntity
return ResponseEntity.status(HttpStatus.CREATED).body(user);
Option 2: @ResponseStatus
@ResponseStatus(HttpStatus.NOT_FOUND)
thrownewUserNotFoundException();
Common status codes:
- 200 OK
- 201 Created
- 400 Bad Request
- 401 Unauthorized
- 404 Not Found
- 500 Internal Server Error
Returning correct status codes is not optional. It's basic REST hygiene.
How do you return custom responses?
You typically create a response DTO.
classApiResponse {
    private String message;
    privateint status;
    private Object data;
}
Controller:
return ResponseEntity.ok(
    newApiResponse("Success",200, user)
);
Benefits:
- Consistent API responses
- Better client-side handling
- Easier error tracking
What is ResponseEntity?
ResponseEntity represents the entire HTTP response.
It allows control over:
- Status code
- Headers
- Response body
Example:
return ResponseEntity
    .status(HttpStatus.CREATED)
    .header("Location","/users/1")
    .body(user);
Why it's important:
- Fine-grained control
- Cleaner API contracts
- Professional-grade APIs
How do you validate request data?
Spring Boot uses Bean Validation (JSR-380).
Step 1: Add validation annotations
classUserDTO {
    @NotBlank
    private String name;

    @Email
    private String email;
}
Step 2: Use @Valid
@PostMapping("/users")
public ResponseEntity createUser(@Valid@RequestBody UserDTO dto) {
    ...
}
Step 3: Handle validation errors
@ExceptionHandler(MethodArgumentNotValidException.class)
Spring automatically:
- Validates input
- Throws exception if invalid
- Returns 400 Bad Request
Data & JPA
What is Spring Data JPA?
Spring Data JPA is a Spring module that simplifies data access using JPA.
Instead of writing boilerplate DAO code, you:
- Define an interface
- Extend a repository
- Spring generates the implementation at runtime
Example:
public interface UserRepository extends JpaRepository<User, Long> {
}
What it gives you:
- CRUD methods out of the box
- Pagination and sorting
- Query generation from method names
- Integration with Hibernate
Difference between JPA and Hibernate
| JPA | Hibernate |
|---|---|
| Specification (API) | Implementation |
| Interface based | Concrete ORM |
| Vendor independent | Vendor specific |
| Defines rules | Provides actual code |
Simple analogy:
- JPA = contract
- Hibernate = company that follows the contract
Spring Data JPA uses Hibernate by default under the hood.
What is JpaRepository?
JpaRepository is a Spring Data interface that provides full JPA functionality.
public interface JpaRepository<T, ID>
It includes:
- CRUD operations
- Pagination & sorting
- Batch operations
- Flush and saveAndFlush
- JPA-specific methods
You almost always extend JpaRepository in real projects.
Difference between CrudRepository and JpaRepository
| CrudRepository | JpaRepository |
|---|---|
| Basic CRUD | Full JPA features |
| No pagination | Pagination & sorting |
| Minimal methods | Rich API |
| Generic | JPA-specific |
What is an Entity?
An Entity is a Java class mapped to a database table.
Example:
@Entity
@Table(name = "users")
public class User {
}
Key points:
- Annotated with @Entity
- Must have a primary key
- Represents persistent data
Each object instance corresponds to one row in the table.
What is @Id and @GeneratedValue?
@Id
Marks the primary key of the entity.
@Id
private Long id;
@GeneratedValue
Specifies how the ID is generated.
Common strategies:
- IDENTITY: database auto-increment
- SEQUENCE: sequence object
- AUTO: provider chooses
What is pagination?
Pagination means fetching data in chunks instead of loading everything.
Spring Data JPA provides:
Pageable pageable = PageRequest.of(0, 10);
Page<User> users = repo.findAll(pageable);
Benefits:
- Better performance
- Reduced memory usage
- Faster response time
Large datasets without pagination are rookie mistakes.
Spring Security
What is Spring Security?
Spring Security is a powerful framework that provides authentication, authorization, and protection against common security attacks for Spring applications.
It secures:
- REST APIs
- Web applications
- Microservices
Key features:
- Authentication (who you are)
- Authorization (what you can access)
- Session management
- CSRF, CORS, filters
Authentication vs Authorization
| Authentication | Authorization |
|---|---|
| Who are you? | What can you do? |
| Login process | Access control |
| Happens first | Happens after authentication |
Example:
- Authentication → User logs in
- Authorization → User can access /admin or not
How does Spring Security work internally?
Spring Security uses a filter chain.
Flow:
- Request enters the application
- Goes through Security Filter Chain
- Authentication happens
- Authorization checks occur
- Request reaches controller (or gets blocked)
Main components:
- SecurityFilterChain
- AuthenticationManager
- AuthenticationProvider
- UserDetailsService
What is SecurityFilterChain?
It defines which requests are secured and how.
Example:
@Bean
SecurityFilterChain filterChain(HttpSecurity http) throws Exception {
    http
        .csrf().disable()
        .authorizeHttpRequests(auth -> auth
            .requestMatchers("/public/**").permitAll()
            .anyRequest().authenticated()
        );

    return http.build();
}
This replaces the old WebSecurityConfigurerAdapter.
What is UserDetailsService?
It loads user-specific data during authentication.
public interface UserDetailsService {
    UserDetails loadUserByUsername(String username);
}
Spring calls this automatically when a user logs in.
What is UserDetails?
Represents the authenticated user.
Contains:
- Username
- Password
- Roles / authorities
- Account status flags
Spring Security does not care about your User entity.
It cares about UserDetails.
What is AuthenticationProvider?
Contains actual authentication logic.
Example:
- Username/password authentication
- JWT authentication
- Custom auth mechanisms
Spring Security supports multiple providers.
What are Roles vs Authorities?
| Roles | Authorities |
|---|---|
| High-level | Fine-grained |
| Prefixed with ROLE_ | No prefix |
| Example: ADMIN | Example: READ_USER |
In code:
hasRole("ADMIN")
hasAuthority("READ_USER")
Roles are just authorities with a naming convention.
How do you restrict access?
URL-based:
.authorizeHttpRequests()
.requestMatchers("/admin/**").hasRole("ADMIN")
Method-level:
@PreAuthorize("hasRole('ADMIN')")
Method-level security is more precise and safer.
How are passwords stored?
Passwords are never stored in plain text.
Spring Security uses PasswordEncoder.
Example:
@Bean
PasswordEncoder passwordEncoder() {
    return new BCryptPasswordEncoder();
}
BCrypt:
- One-way hashing
- Salted
- Slow by design (prevents brute force)
What is JWT?
JWT (JSON Web Token) is a stateless authentication mechanism.
Contains:
- Header
- Payload (claims)
- Signature
Client sends JWT with every request:
Authorization: Bearer <token>
How does JWT authentication work in Spring Security?
- User logs in
- Server validates credentials
- Server generates JWT
- Client sends JWT on every request
- Custom filter validates token
- SecurityContext is populated
JWT is usually implemented using a custom filter.
Transactions
What is a Transaction?
A transaction is a sequence of database operations that are treated as one single unit of work.
Either:
- All operations succeed, or
- All operations fail
There is no "half done but vibes are good" state.
Example:
transferMoney() {
    debit(fromAccount);
    credit(toAccount);
}
If debit succeeds but credit fails, the system must rollback. Otherwise, congratulations, you just invented financial fraud.
What is @Transactional?
@Transactional is a Spring annotation that manages database transactions automatically.
When Spring sees @Transactional:
- Opens a transaction before method execution
- Executes the method
- Commits if successful
- Rolls back if an exception occurs
Example:
@Transactional
public void createOrder() {
    saveOrder();
    savePayment();
}
What is ACID?
ACID defines the guarantees of a reliable transaction.
A: Atomicity
All or nothing.
- Partial changes are not allowed.
C: Consistency
Database moves from one valid state to another.
- Constraints are respected.
I: Isolation
Transactions don't interfere with each other.
- One transaction doesn't see incomplete data from another.
D: Durability
Once committed, data will not disappear, even after crashes.
What happens if a transaction fails?
If a transaction fails:
- Spring rolls back all DB changes
- Database returns to its previous state
Important detail:
By default, Spring rolls back only on:
- RuntimeException
- Error
It does not roll back on checked exceptions unless configured.
@Transactional(rollbackFor = Exception.class)
Rollback vs Commit
| Commit | Rollback |
|---|---|
| Saves changes permanently | Discards all changes |
| Happens on success | Happens on failure |
| Makes data durable | Restores previous state |
Testing
How do you test Spring Boot applications?
Spring Boot testing is done at different levels, because not everything deserves the same amount of setup.
Main testing types:
- Unit tests → test a single class in isolation
- Integration tests → test how components work together
- End-to-end tests → test full application flow (less common in interviews)
Spring Boot provides:
- Auto-configured test context
- Embedded servers
- Mocking support
- Annotations that slice the application cleanly
Good tests are fast, isolated, and reliable.
What is @SpringBootTest?
@SpringBootTest loads the entire Spring application context.
@SpringBootTest
class UserServiceTest {
}
What it does:
- Starts full Spring context
- Loads all beans
- Can start embedded server
Use when:
- Testing integration between components
- Verifying real configuration
- Testing database + service + repository together
What is @WebMvcTest?
@WebMvcTest is a slice test for the web layer.
@WebMvcTest(UserController.class)
class UserControllerTest {
}
What it loads:
- Controllers
- Filters
- Jackson config
- MVC infrastructure
What it does NOT load:
- Services
- Repositories
- Database
Difference between Unit Test and Integration Test
| Unit Test | Integration Test |
|---|---|
| Tests single class | Tests multiple components |
| Uses mocks | Uses real beans |
| Very fast | Slower |
| No Spring context | Full/partial context |
| Catches logic bugs | Catches config & wiring bugs |
Rule of thumb:
- Unit tests for logic
- Integration tests for correctness
What is Mockito?
Mockito is a mocking framework used to create fake objects.
It allows you to:
- Mock dependencies
- Define behavior
- Verify interactions
Example:
when(repo.findById(1L)).thenReturn(Optional.of(user));
Mockito does not need Spring. It works independently.
What is mocking?
Mocking means simulating the behavior of real objects without using them.
Why mock?
- Avoid database calls
- Avoid external services
- Make tests faster and deterministic
Example:
@Mock
UserRepository repo;
The mock:
- Does not hit DB
- Returns controlled values
- Allows interaction verification